Friday, November 30, 2012

Belly up to our home-built, super awesome basement bar!


Okay this space doesn't fall into the category of romantic, or cottage, or any of that... it just falls into the category of kitschy fun! 

When we moved to our new house in 2008, the previous owners left us a pool table in the basement rec room. So we decided to go with the theme and make a game room and bar out of it. We painted it English pub green, Mr. Piglet built a fabulous bar, and we covered the walls and surfaces with fun, entertaining and vintage stuff. Activities for this space include pool, Wii, karaoke, and drinking - those last two being my personal favorites. Ready for a tour? Here we go! 

This is (obviously) the main bar area. The bar itself is hand-built, made from kitchen cabinets (uppers) and then faced with hollow-core doors. 


Another view of the bar. The top is also made from hollow-core doors, joined together in an L shape and then anchored to the base with L-brackets.


Here's the bar mirror and the "top shelf," also hand-built by Mr. Piglet. I like the little rail that corrals the bottles.


Here's a close-up of the bar top. We glued down dozens of these little "dash plaques" from many of the car shows we used to go to, then poured liquid epoxy all over it. The epoxy was a mess-maker, but it turned out really neat.


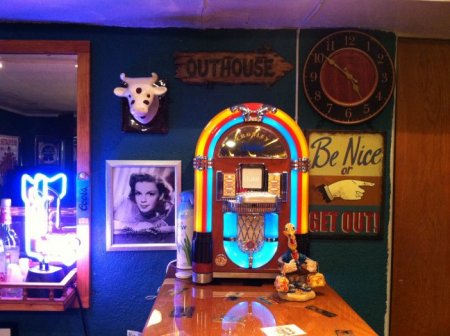
The jukebox plays an iPod so you can pump your favorite playlist into the bar. Next to the box is one of several autographed celebrity photos all - miraculously - made out to Steve (Mr. Piglet)! The one shown here says, "Steve - we'll always have Paris! Love, Judy." 


Here's the door to the "secret room." Seriously! When we were going through the house with the home inspector after making our offer, we didn't know this door was here. A large armoir was parked in front of it. The inspector looked at it from across the room, and said, "Oh, watch this." He walked over to it, pulled on the armoir, and the whole thing opened on a hinge revealing a little storm shelter room! Obviously he had seen this sort of thing before. We had been in the house at least three times before that, and NEVER knew the armoir was attached to a door!


Here's a closer shot of the door. That's faux "diamond plate" and faux "rivets" covering the door - hoping it looks like a heavy-duty industrial bomb-shelter door... which just happens to have a tamborine hanging on it, in case Linda McCartney stops by.

Hey I could've said Davy Jones, but he's unavailable.

What, too soon...? 


The basement has a very nice fireplace, but the chimney is all screwed up so we never use it. Here's a look at the mantel, again hand-built (but not yet finished). Over on the right you can see the singer's karaoke screen - the lyrics also appear on a larger tv on the wall out of frame so everyone can see them and sing along. You can also see a few more celebrity photos ("Steve: Many thanks, Jimmy Stewart"). 


Close-up of some items on and above the mantel. That's my "Bar Hounds" picture, of course, and some other family-favorite items. The Hamms Bear calendar has the name of a TV show on it - "Beat the Bear," which was a local sports prediction show here in the 60's and 70's. The show was sponsored by Hamms, and featured a guy wearing a Hamms bear suit who would come out and write down his predictions for who would win the week's Big Ten college football or basketball games. Viewers would send in their own predictions and try to out-guess the Bear. (Hence, "Beat the Bear.") For years, my dad was the guy in the bear suit. 


Finally, here is a little corner where you can listen to the karaoke or wait your turn at the pool table. 


Overall the space is not entirely finished yet (there is still some blank wall space here and there... plus the carpet desperately needs to be replaced!)... but it is a fun party room! 

I'm linking our party room to the Remodelaholics' "Fun Spaces" link party! Join me for a beverage? 

Pin It

Sunday, November 25, 2012

Swooning over Old Country Roses


I promise to stop talking about dishes real soon... maybe... but right now I just have to SQUEAL with delight over Old Country Roses. Why? Because I recently completed a "Buy It Now" listing on Ebay for four dinner plates, and they arrived on my doorstep yesterday, just as described (perfect!) and for a great price. With the purchase of these plates, I can now serve dinner for six and am only one plate away from dinner for eight!  

This beautiful pattern by Royal Albert of England is the fairest in all the land as far as I'm concerned. It is  the Holy Grail of dishes for me. It was launched in 1962 (the same year as me!), and is still in production today. It is the most popular pattern ever produced by the Royal Albert company. Yet I cannot remember the last time I saw an individual piece in a thrift or antique store, let alone at a bargain price. And on Ebay, individual dinner plates generally range from $10-16 each, plus an additional $10-12 for shipping. I am just too cheap, and too impatient, to pay that much and wait for reasonable auctions to come along, so my OCR journey has been long and frustrating. 
This past week, however, a few stars aligned. I found an Ebay auction for FOUR dinner plates, with a "Buy It Now" price of $45 - that was only $11.25 per plate, and that included shipping! After carefully reading the listing and consulting a Royal Albert web page devoted to Old Country Roses and its various backstamps, I determined that the plates shown online were actually made in England (not Indonesia, as has been the case more recently) and were at least purported - by a seller with 100% positive feedback - to be in excellent condition. I even had (arguably) a spare $45 to spend. 
After thinking it over for... oh, maybe 30 seconds, I realized that if I were at the antique mall where shipping is not a consideration, and I spotted four OCR dinner plates in excellent condition for $11.25 each, I would snap them up. So I did the "Buy It Now" and then waited anxiously for my plates to arrive intact. Yesterday, they did - and they're beautiful!  

I tell you, I almost cried. For now, after a dozen years of collecting, I think I will finally serve Christmas dinner on Old Country Roses! 

Pin It

Saturday, November 24, 2012

New dish acquisition


I am apparently really drawn to some of the patterns of Martha Stewart Everyday! After stumbling upon these lovely pastel yellow plates, and then later these almost-Irish "Garland" salad plates, I've once again found a great little MSE bargain at a local thrift store. 

Today my acquisition was a trio of these soft blue salad plates with a "weave and pleat" design - I am not sure of the pattern name, but they were a steal at 99 cents for all three. 


I brought these little beauties home and washed them up, and immediately tried them in a couple of different stacks to see how I might use them. Here's one sandwiched between a bright white Corning "Tulip" dinner plate and an unmarked mid-century bread plate. 


Here it is with a Royal China Currier & Ives bread plate: 


And here it is with no bread plate at all -  


These would've looked super cute on my Easter table with the "crazy daisies"! Can't wait to use them! Have you found any special treasures lately while thrifting? 

Pin It

Friday, November 23, 2012

A vintage start to Christmas decorating


I hope you had a lovely Thanksgiving! I've been feeling a little under the weather all week, but other than that our holiday was perfect. Our little family of three traveled across town to celebrate with my husband's family at his sister's home, and as always it was a large and noisy group. My daughter was home for the week, but had to go back to school on Friday due to her work schedule, and by Friday afternoon I had the Christmas decorating bug so I decided to set up a little Christmas tree in my "Mom cave."

I had done some after-Christmas shopping last year and acquired a nice little collection of vintage ornaments,  with a vision in my head of doing some sort of "shabby" tree. I had a brain-fart, though, and bought a three-foot green tree (instead of white) which was super-cheap at the time but not quite what I wanted. Around that time I test-sprayed some fake garland to see if painting my green tree might be an improvement, but decided it would not. So I've known all year that my little office tree would have to be green instead of white. 

 It's impossible for me to take a good picture of a decorated Christmas tree and have it look as pretty as the tree looks in person - but, pictures of individual ornaments always come out pretty good. So, here is my little Mom-cave tree - covered with vintage ornaments but not as "shabby" as I originally intended. (I'm thinking of tying hand-torn muslin "ribbons" on some of the branches - wonder what they would look like?) 

My vintage finds included a small selection of old "Shiny Brites" - the classic ornaments we remember as kids...
I also found a box of small "textured" ornaments, some a pretty rose-red and others a soft white:
I just love little "Goldie" back there, she's only about an inch in diameter. I purposely put her toward the back so she'd be a pretty reward for stepping up to take a closer look. 
I also found a set of four of these large ornaments painted with violets - not vintage, but I fell in love with the violets. I had some hand-crocheted snowflakes in a stash from my mother-in-law's estate. 
Here's another crocheted snowflake, with a large peach-hued textured ornament in the background. 
Found a set of twelve of these spun-glass hearts in a thrift store - they really glimmer in-amongst the lights! 
For the topper, I pulled the floral decoration from my mail tin, and used three little angels from the crochet stash. VERY shabby-sweet, no?
Next-day update: This pretty three-tiered eyelet skirt sure shabs it up! Found this at the Goodwill today - it's not really a tree skirt. In fact I'm not sure what it is - maybe a bassinet liner... maybe an infant car seat cover. Anyway at $2.59 it was certainly all mine - all that beautiful eyelet! 

I'm not sure when our tree will go up in living room. My daughter tells me she would like to help, but she doesn't come home for Winter Break until mid-December. I'm not sure I can wait that long! How's your Christmas decorating coming along - have you started yet?
Pin It

Wednesday, November 21, 2012

Our little shopping spree


A friend of mine from high school owns a home furnishings store here in Des Moines called The Mansion. It is filled with beautiful home accessories, custom furniture, and talented designers. Recently, The Mansion has been running a series of "comment contests" on Facebook. The one that caught my eye was for a $20 gift certificate, or 20% off a purchase, and the question was, "Tell us what you love about holiday decorating." Here was my answer: 

My daughter, now 19 years old, told me recently that one of the things she remembered most fondly about our old house - which was destroyed in the 2008 flood - was the way it was always decorated for Christmas. This touched me, because it was a very small & modest house - not "grand" in any sense of the word. But apparently the holiday decorations, many of which were handmade by her and I, were a big part of her favorite childhood memories. Of course we haven't been able to really duplicate all the things we lost that we had made together, but even with mostly store-bought things I still love making the effort to decorate because I know now that it not only makes it feel like Christmas for *me,* but for her as well.
A couple of days later, I was absolutely thrilled to discover that they had not only named me the winner of that contest, but they had also very generously increased the gift certificate to $100! My daughter, whose sentiments were the core of my comment, also commented on their page and thanked them.  
All of this is to be able to share with you that today, we went to their store and were able to choose two very lovely items. 
First, Stephanie chose this ceramic trinket box with the sweetest elephant finial: 


And, my selection was this beautiful blown-glass pumpkin:
What a lovely way to spend some time with my daughter, and a great opportunity to experience my friend's store! 

Pin It

Tuesday, November 20, 2012

More OCR coming my way... I hope!


Haven't been around here for awhile but I am soooooo excited about an upcoming change in my Old Country Roses ownership status. I am about to go from having "a few stray pieces" to having SEVEN beautiful dinner plates. I seriously just want to squeal! More soon... I will tell the whole story when I know it's finally true. Fingers crossed! 


Pin It

Sunday, August 26, 2012

Dollar store sign blank transformation


I'll admit I didn't accomplish too much this weekend - funny that during the week, I have all these big ideas at work about what I'll do with my days off, then when faced with them I have a hard time finding direction. I did take some time to finish one small project, a pretty bit of wall art that started out as an unfinished sign blank from the Dollar Tree.  


My ideas for this little piece included making a hand-painted sign using one of the many amusing quotes I've been finding on Facebook and Pinterest (maybe this one: "If a ship doesn't stop at your port, it wasn't your ship.")... or, making it look like a plank from an old fruit crate, complete with peeling label. Up until today, I was leaning heavily toward the former. But once I got to sifting through some images from The Graphics Fairy, I found a beautiful label I couldn't resist - even though it wasn't fruit-themed. 

I started the project by removing the hanging string and then lightly staining the unfinished blank with a Minwax maple stain. I dabbed on a couple of coats, including the back and edges. 


I then selected a piece of scrapbook paper which - at the time - I thought would lend itself well to having lettering painted on it. It was a subtle color, with a lovely pattern that wasn't too intrusive. I wanted this to have an aged look too, so I tore the paper into the size I wanted rather than cutting the edges. 


I glued the torn scrap to the front of the blank using ModPodge, then brushed a layer of the maple stain over the whole piece. This served to "age" the bright white torn edges of the paper and made the paper look like it had weathered along with the wood. Once that was dry, I brushed a layer of ModPodge over the entire piece. 


Next I printed out my chosen label, trimmed it closely, and used ModPodge to glue it to the sign blank. I brushed on yet another layer of Minwax stain over everything, let that dry, then finished up with a final layer of ModPodge to seal the deal. 


I really like the overall result... I wish the sign blank itself had looked more authentically aged, but I think my efforts to "old it up" gave it a distinct personality. 


Pin It
Related Posts Plugin for WordPress, Blogger...