Showing posts with label Craftarific. Show all posts

Saturday, March 9, 2013

Featured at Dollar Store Crafts!


What a nice little surprise this week to discover that my "quick, cute centerpiece" project had been featured over at the Dollar Store Crafts blog


I had entered the project in the "30-minute Challenge" contest, and although I didn't win it's quite a thrill to see one of my projects "up in lights" at a blog filled with such creative projects! Wondering who won the Challenge? It's Suzi from Suzi's Crafts, who shared a cute, colorful night light cover

More soon,


Pin It

Friday, February 8, 2013

Office chair slipcover - a romancey makeover

I'm so excited to be able to share this little project with you! It's one of the elements of the Mom Cave that really needed to be brought in line with the look of the room, but I wasn't sure how to go about it. In the end, I just love how it turned out. It's my office chair - a thrifted bargain at $8, with good back support and one stray wheel that sometimes slides across the floor rather than turning.


After considering a tailored re-upholster where I would actually remove the padded parts and recover them, I decided instead to go with the "slipper chair" look of a slip cover. Advantages: removable, washable, and a whole lot less frustrating than trying to figure out how to take this chair completely apart. 
After thinking and studying on this for quite awhile (we're talking MINUTES, people!), I decided that I would further simplify by doing a two-piece outfit where the top and bottom just easily slip into place. Here's the result: 


Isn't she just super-cute? She looks like she's wearing bloomers!  


Fabrics were all from my stash: a beautifully aged patio cushion cover...


A standard pillow sham, deconstructed (it was this tutorial on doing a ruffle that gave me the shove I needed to go forward with this project!)...


...and an ivory colored eyelet bedskirt. 


Her top is a section of the cushion cover, sewn with slightly rounded corners like the cozy I made for my can opener in the kitchen. I sewed a bit of the bedskirt to the back. This piece, of course, fits by just slipping it over the back of the chair. 


The new seat cover isn't even enclosed - it's just a flat piece, with the ruffle and bedskirt sewn around. It fits by just tucking it in to the junction between the existing back and seat of the chair. 


Now make no mistake, I think Little Miss Fancy Pants here is adorable... but the true test is whether all this new finery has impacted her functionality as office furniture. My helper assures me it has not. 


(Gratuitous cat picture: doesn't Lily look pleased that I have disturbed her slumber?)


Doesn't it just make you want to sing, "Three Little Maids From School?" 

No? 

Maybe that's just me :) 


I'll be sharing my sweet little office chair makeover at these lovel parties: 


More soon, 
Pin It

Friday, January 25, 2013

Trash to treasure: a gorgeous junky picture frame


This little project is actually not finished. But I love it so much, I just have to share it! 

In 2008, our home on Des Moines' north side was destroyed in flooding. The city purchased the house and property from us shortly afterwards, and demolished it. In the few years since, we've occasionally driven past the site. Sometimes, we get out of the car and walk around - I'm not entirely sure why, but it seems to bring a little comfort at times when we get to reminiscing about the loss. 

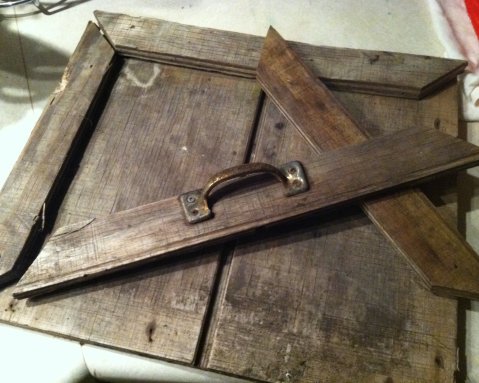
On one such visit, we noted that someone had dumped a truckload of junk in our old backyard. This little cupboard door was calling my name, and I plucked it from the middle of the pile to study it. 


I absolutely love the worn texture - it reminds me of linen fabric or linen-finish paper. 


I knew for sure I wanted to make some sort of picture frame, but I didn't have any particular shots in mind when I first picked the little door out of the junk pile. It wasn't until we saw Stephanie's beautiful senior pictures (taken by Des Moines photographer Randy Shebek) that I knew I had just the right images to complement this frame. 

(all photos of Stephanie are by Randy Shebek, Great Life Photography)


Mr. Piglet helped me repair the cupboard door - I nailed the frame pieces back together and he glued and clamped them to make sure they would stay in place. He dug through his own stash to find a couple of nails that looked appropriately weathered - "You don't want new nails in there, they'll look out of place," he said. (I LOVE that he had the same vision for this project!)  


Once it was all dry,  I selected two 5x7 pictures - one with a very distinctive natural element, the stone, to complement the textured wood, and one with some color in the background to draw attention. 


I added a piece of vintage lace in one corner as a background element, and created depth by stacking two pieces of foam core board, smaller than the right-hand photograph, and attaching that photo to the "riser" created by the foam core. Note the shadow cast by the "raised" picture, in the photo below.


To finish, I am on the hunt for a used Scrabble game so I can spell out either Steph's name or a word or two to describe her with the tiles. And I'm still thinking about what, if anything, belongs in that lower left corner. I'll post a follow up when I finally get it complete, but it's already one of my new favorite pieces in the house because it uses three of my favorite elements: weathered junk, bits of vintage finery, and my amazing daughter! 


I'm linking my junky picture frame to Donna's fabulous Saturday Night Special Party at Funky Junk Interiors. So much beautiful junk, so little time! 

Pin It

A rosy cozy and a killer piller


Just sharing a couple of sewing projects I completed this week... I have a third but I think it needs a little something more so I don't consider it finished yet. More on that one soon! 
First up is this soft, cuddly sweater pillow that I attempted to whip up one night this week, and ended up running my finger through the sewing machine - OUCH!! 
Turns out, trying to stitch over this bulky knit is harder than one thinks it's going to be: the "tines" of my presser foot kept getting hooked in the knit, so I had to run my fingers very close to the needle to keep the knit pressed down so the foot would run smoothly. And in the process, ended up getting my finger directly under the needle. In and out, all the way through, one time. 
A little cold water, a little peroxide, a little pressure... and all is better. As for the pillow - well it's not quite square but it's cute nonetheless, and super-soft. 
The second project is a sweet floral "cozy" that I made from a finished standard pillow sham, to fit over the scanner/printer that sits on my work table in the mom-cave. I mean, let's face it: a shiny black plastic printer just doesn't look "shabby," or cottagey, or romantic at all. 
I had a reversible cozy I'd made many years ago for a desktop copier, but it wasn't quite the right size. This pretty sham from Mainstays - a thrifting find at 99 cents - was perfect for this project. I didn't even deconstruct it; I just boxed the corners of the finished sham and called it good. 


I'm sharing this week's projects at Donna's Saturday Night Special at Funky Junk Interiors! I'm also sharing  at Jill's A Round Tuit party - because, these projects have been on my to-do list for awhile! 
Pin It

Wednesday, January 2, 2013

Homemade treat trays


Here is my first project of the year! I used a couple of pretty vintage floral plates, thrifted candlesticks of different heights, and some E6000 glue to put together these sweet little treat trays. Now mind you, I have NEVER had occasion to use treat trays like this... but, I'm convinced that's only because I've never had them before. 


I plan to make up a reason to use them soon! This project was so easy there's really no tutorial needed, but I will say the trickiest part is centering the candlestick on the bottom of the plate. So, eyeball it carefully... or, "measure twice, glue once"... or, whatever your centering mantra may be... and give it a try! 

I'm sharing these pretty servers with Suzanne for Vintage Thingies ThursdayTransformation Thursday over at Shabby Creek Cottage, and Stephanie Lynn's Sunday Showcase at Under the Table and Dreaming. Thank you to these lovely ladies for hosting such wonderful link parties each week!  


Pin It

Sunday, August 26, 2012

Dollar store sign blank transformation


I'll admit I didn't accomplish too much this weekend - funny that during the week, I have all these big ideas at work about what I'll do with my days off, then when faced with them I have a hard time finding direction. I did take some time to finish one small project, a pretty bit of wall art that started out as an unfinished sign blank from the Dollar Tree.  


My ideas for this little piece included making a hand-painted sign using one of the many amusing quotes I've been finding on Facebook and Pinterest (maybe this one: "If a ship doesn't stop at your port, it wasn't your ship.")... or, making it look like a plank from an old fruit crate, complete with peeling label. Up until today, I was leaning heavily toward the former. But once I got to sifting through some images from The Graphics Fairy, I found a beautiful label I couldn't resist - even though it wasn't fruit-themed. 

I started the project by removing the hanging string and then lightly staining the unfinished blank with a Minwax maple stain. I dabbed on a couple of coats, including the back and edges. 


I then selected a piece of scrapbook paper which - at the time - I thought would lend itself well to having lettering painted on it. It was a subtle color, with a lovely pattern that wasn't too intrusive. I wanted this to have an aged look too, so I tore the paper into the size I wanted rather than cutting the edges. 


I glued the torn scrap to the front of the blank using ModPodge, then brushed a layer of the maple stain over the whole piece. This served to "age" the bright white torn edges of the paper and made the paper look like it had weathered along with the wood. Once that was dry, I brushed a layer of ModPodge over the entire piece. 


Next I printed out my chosen label, trimmed it closely, and used ModPodge to glue it to the sign blank. I brushed on yet another layer of Minwax stain over everything, let that dry, then finished up with a final layer of ModPodge to seal the deal. 


I really like the overall result... I wish the sign blank itself had looked more authentically aged, but I think my efforts to "old it up" gave it a distinct personality. 


Pin It

Sunday, August 12, 2012

Son of Zipper Pouch


We've been on two cruises in our lifetime, and both times we took the exact same boat and the exact same itinerary. We've been to the Sturgis Rally in South Dakota twice, and both times we took the same route and the same scenic rides. So it's not too surprising that when I needed to make a second zippered pouch, I used the same fabrics, with the same details, that I used the first time around


The first pouch I made using Kate's super-simple tutorial at See Kate Sew turned out so cute... my daughter loved it as much as I did, and she used it as her pencil pouch at school until the day her car was broken into and her backpack stolen. The little pouch disappeared that day too, along with her camera, some personal letters, and a couple of textbooks. 

Now that she's headed off to college, she asked me if I'd make her another pouch so of course I couldn't say no. I used all materials on-hand, so the trim is a little different - and I'm still working without a zipper foot so I had to work carefully around the zipper pull. But overall this "second draft" turned out just as cute as the first one, and again I just have to say how easy the tutorial was for this project. 


I may need to make a few more of these! 

Pin It
Related Posts Plugin for WordPress, Blogger...